Makerspaces: Just for Libraries?

makerspace hand

I am a classroom teacher, working with Year 3 students at the moment. Our school library has not yet opened itself up to a broader spectrum of possibilities for the students to any real degree. It is only this year that we are trialling e-books in the library.
Having heard about ‘Makerspaces’ over the course of the past couple of years, I admit I was interested in finding out more … good intentions – but life intervened. I has heard about them with regards to the amazing things they were doing in libraries to bring out this creativity with learning.

During some recent study I was reading about “Participatory Knowledge Cultures” (Delwiche and Jacobs Henderson, 2013) and it once again sparked an urge in me to find out more about how this might be used in the primary school environment. I decided it was time to ‘bite the bullet’ and learn more about makerspaces. I am both overawed and intimidated. I never imagined such a plethora of information, techniques, activity types and more could be found on this topic. Not knowing where to start, that’s where I went. The ‘what’, ‘how to’ and ‘where to’ were the first questions I asked. Here is my understanding of the concept and particulars of including this in the classroom – yes, it does not have to be just for the library or a central work area.

WHAT IS A MAKERSPACE?
A makerspace is a place where people with similar interests, skills or intentions come together to work on creative projects. They share knowledge, ideas and equipment to reach their goals. In the school setting, think of it as learning through play; changing and flexible educational goals drive a range of activities – usually involving technology and design elements. Makerspaces use the interest to strengthen the willingness to explore, create, invent and participate. It is highly collaborative, encouraging students to openly and freely share what they know with others with the same goals.

WHY USE MAKERSPACES?
The ongoing goal in education is to encourage students to be lifelong learners, to be able work collaboratively and to think creatively. I spent some time on a site called Makerspace Australia. There was a lot of good information, though generally targeted at developing these systems for older students – in high school or tertiary learning. There was a quote on that site which they had used that I thought particularly descriptive which I would like to share. Makerspaces are “centers of active or participatory learning … [learners] … use materials and tools but are driven by a mindset of community, creativity and collaboration.”

The degree of difficulty is what you make it. Sticks and glue and feathers to make a bird – cardboard boxes and tubes to create a maze of tunnels … these things are achievable. There are many companies that supply kits for the children to work on, from adding glowing eyes to a Halloween image to creating more complex circuits using breadboards. Obviously, budget would buy into these decisions. My class is not ready for this yet – I don’t think I am either. We will start off with simple, achievable tasks and work our way up to wonderful. This is what I want for my class and for the children I will continue to teach in the years to come. I will, however, say with conviction, ‘No! It is not just for libraries!’

References:
Delwiche, A. & Jacobs Henderson, J. (2013) The Participatory Cultures Handbook. New York: Routledge.
Makerspace Australia. http://www.makerspaceaustralia.weebly.com/what-is-a-makerspace.html

To Blog or Not to Blog

WEB LOG

WE BLOG

BLOG

So … you must start a blog … for whatever reason – and you have no idea where to begin.

Someone sends you a list of blogging sites where you can get a FREE account.
GREAT!

What do you do?

Well, if I was under the age of 40 I would probably have hit You Tube first – that’s where all the best learning happens these days. If you need to …

… knit a hat

… draw a picture                           crocodiles-2707229_960_720

… bake a cake

… learn to dance …      

But I didn’t go there.


I went straight to wordpress.com – not wordpress.org – because that is apparently more hardcore than I need.

So, I started trying to put something together.

I’VE DONE IT!

No, I hadn’t …

THIS WILL WORK!

No, it didn’t …

So, I finally had a brainwave and thought of You Tube – it takes a while when your brain has matured                 wine-541922_960_720

… like waiting for wine to ferment and produce something worthwhile.

Even step-by-step tutorials – which I later tracked down, assumed some familiarity with terminology that I didn’t have. None of them were produced by WordPress – just users who knew what they were doing already.

NOTE TO SELF: check the date it was made – it’s 2017 – before wasting 20 minutes watching the how-to from the 2011 version of the site.

I used a ‘search engine’ for ‘how-to-start-a-blog’ and found lots of blogs about blogging – what to do and what not to do. I think I had already done some of the ‘nots’ …

Still confused.

More work on my blog – I’VE FINALLY DONE IT!

Sent the link to my other team members and they couldn’t access it. After several weeks of them having to dodge around the ‘sharing site’ we were using for a different purpose, I finally realised why – I had sent the wrong address/link. It had worked for me – because it was on my computer and my account was open!

I finally sent the right one.

So, anyone needing or wanting to start a blog for any purpose…

… work

… leisure

… friendships

… journaling

… study

… special interest, or

… you are so incredibly amazing you need to share that with the world        the-witch-641232_960_720

… then here are a few basic words you need to know before starting the process, that will make it much less painful.


DEFINITIONS:

Warning: Some of the definitions include words that may also need defining.

APPLICATION: ‘app’ for short – we know the term – is a computer program designed to provide an activity or task for the user, and different from system software.

DASHBOARD: User interface so help you find your way around. It can be a quick way to find the most useful commands – if you know what you are looking for …

DOMAIN: a part of the internet with address sharing a common name or under the control of a group. This is called the domain name.

e.g. www.microsoftwww.google

EXTENSION: Extensions can be different types of file names such as ext. exe. Jpeg. gif. It can also be extension add-ons that change, enhance or add extra content.

INTERFACE: how the user interacts, for example, using a web browser to access something on the internet. Windows would just be a mass of text if they didn’t have a graphical user interface to change it and convert it to what we see.

PLATFORM: technologies that are used as a base to develop other applications or processes -Windows and Mac are both platforms, providing a fundamental structure that can be built upon.

PLUGINS: These are like add-ons or extensions.

RSS FEEDS: An example would explain it best – a website has data it wants to deliver, but you only want what is relevant to you. You can filter content using key words, and that will be all that is sent to you. An example of an RSS feed is Outlook which has a built feed viewer for Microsoft news.

TAGLINE: a slogan or catchphrase – on WordPress it is ‘Just another WordPress site’.

USERNAME: This one wasn’t hard

WIDGET: an application, or part of an interface, that lets a user perform a task – like a cross between a dashboard and an extension. Windows Vista tried out widgets – small tasks like a little clock or a snow globe.


Images

CCO Creative Commons – No attribution required – Pixabay

Free for Commercial Use

https://goo.gl/images/opM8oi

CCO Creative Commons – No attribution required – Pixabay

Free for Commercial Use

https://pixabay.com/en/crocodiles-dancing-cartoon-cute-2707229/

CCO Creative Commons – No attribution required – Pixabay

Free for Commercial Use

https://pixabay.com/en/the-witch-woman-strassenfasnet-641232/

References:

Reference was made to the following websites or ‘platforms …

Windows

Windows Vista

Mac

You Tube

Outlook

Google

SAMR and a Sample

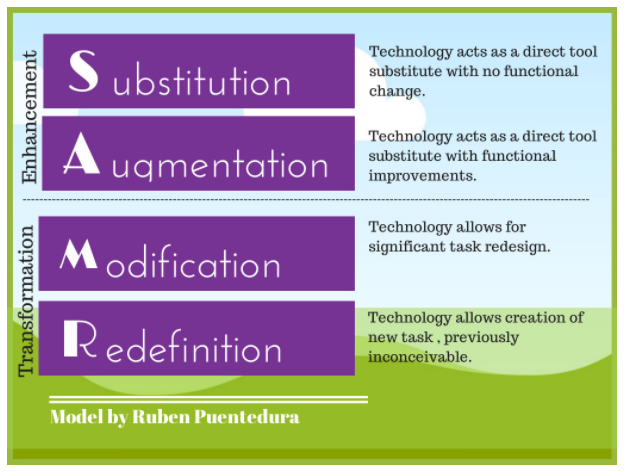
The SAMR Framework was developed to provide an effective yet explainable method for the integration of technology into the educational environment – whether primary or high school – without forcing teachers into major meltdowns or spiralling into the depths of techno-despair. It is an instructional model which outlines four categories of use, ranging from the simple substitution of one tool for another (enhancing) to a completely innovative re-imagination of what is possible for students and teachers to achieve (transforming). There is a YouTube clip that can be accessed which is easy to watch and understand – ‘SAMR in 120 Seconds’ – https://www.youtube.com/watch?v=us0w823KY0g . It is well worth watching.

The Four Categories of SAMR

SAMR Model - Ruben Puentedura.PNG

Image retrieved from emergingedtech.com (see below for full URL)


SUBSTITUTION

This is the basic level where there is no real functional change, the user is simply transferring one type of technology for another. An example of this might be simply choosing to use a word processing program and write a book review online, instead of creating a hand-written document to present.

AUGMENTATION

Taking the use of technology one step further, where the goal is still to create a book review, students would still be typing the review using their computer. The shift to the next level could be to use Google docs to complete the task, allowing for greater flexibility and accessibility by the author of the document, and perhaps the inclusion of visual elements such as a picture to the completed project.

MODIFICATION

The options available now are increased. At this next level, students can write independently, or can co-author the text using Google docs, with each being able to access the document in their own space and time. This allows for immediate collaboration and feedback. In the case of the book review, a small group of students have chosen the same text. Each has access to the project and can add or take away from the text, with respectful discussions about the best options for all involved.

REDEFINITION

This is the highest level of the SAMR Model and quite often the most difficult one for educators to get their heads around. Activities done at this level are ones which could never be achieved without the intervention of technology – the complete redesign of a task. In the case of the book review, the use of Google docs remains, however students can record a voice comment, or read specific snippets of text and embed it within the final product.

SAMPLE

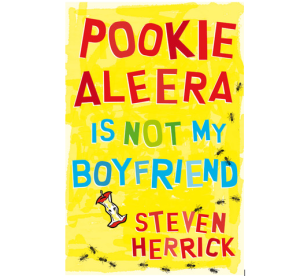
Using my favourite book this month, ‘Pookie Aleera is Not My Boyfriend’ as the text being reviewed, the SAMR process could follow this simple outline:

SAMR Category Book Review Activity – Pookie Aleera is Not My Boyfriend
Substitution Type the book review using a word processing program
Augmentation Type the book review onto a Google doc and add an image to the text
Modification Students could add a verbal description of a favourite part of the prose novel, or use the paint program to create a character from the novel to include in their document
Redefinition This category has a lot of possibilities for those who want to push the boundaries of the simple book review.

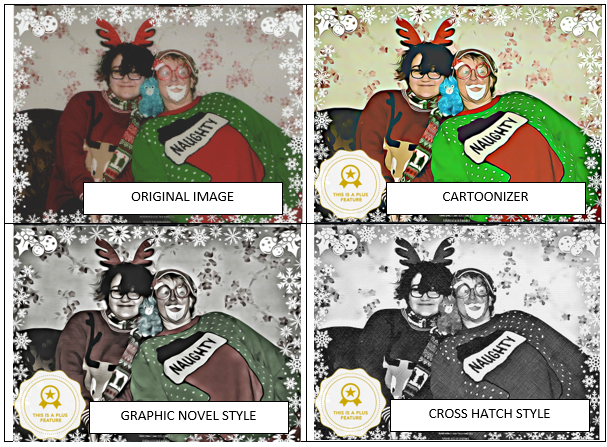
Using the paint program or another drawing tool, the resulting image can be ‘cartoonised’, and used in the creation of a 6 or 9 block scene. This could be directly from the text or an extension using an imaginary scenario – perhaps to fill in the blanks …

Sounds could possibly be added.

The tool used for this was Befunky.com. It allows users to transform a photo into a cartoon and does work with other types of digital images so handmade artwork could be scanned and used.

Once those images have been created, they can be used with another program on the fotojet.com site which allows you to use original photos or pre-made ones to create a comic strip.

A second alternative would be to use the images from Befunky.com in Powtoon.com to create animated videos.

There are tutorials available to help new users and not so new users to achieve positive results on most sites.

Example of before and after the ‘cartoonising’ of an image:

Befunky cartooniser example
I have used these programs previously for more simple tasks and have had no problems, but have not yet attempted the activities of the redefinition category. These are simply possibilities to re-image the world of student task assignments using the SAMR Framework.The ‘emergingedtech.com’ has more ideas and links that provided me with a lot of ideas for this task creation.

SAMR in 120 Seconds

https://www.youtube.com/watch?v=us0w823KY0g

SAMR image retrieved from

http://www.emergingedtech.com/2015/04/examples-of-transforming-lessons-through-samr/

 Befunky.com

https://www.befunky.com/create/photo-to-cartoon/ 

Fotojet – Photo comic maker

https://www.fotojet.com/features/misc/photo-comic.html

Powtoon.com

https://www.powtoon.com/home/


Pop Culture and Year 3

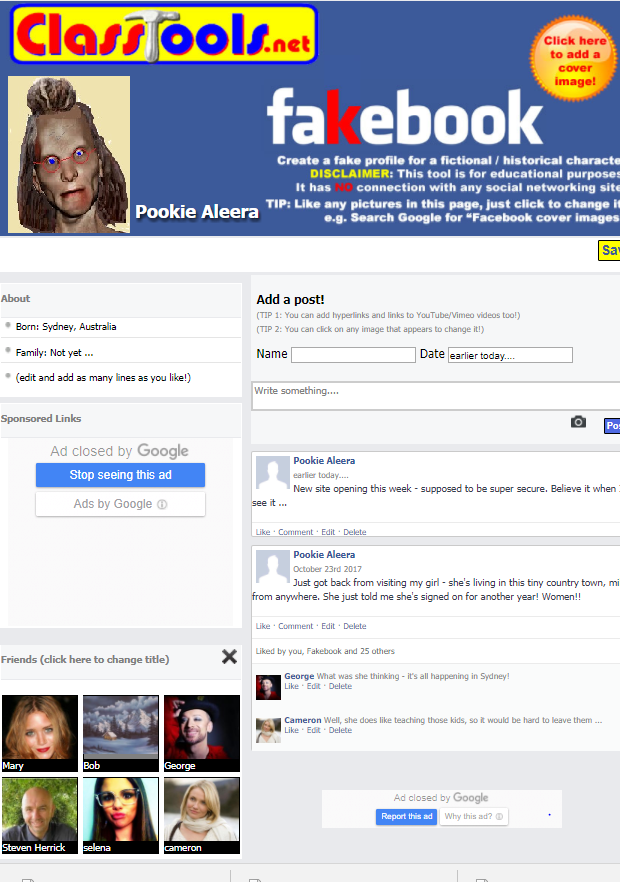
Accessing many of the elements of popular culture which relate to the use of social media is not an option when teaching 8 and 9 year olds. As everyone, including parents and teachers, should know, the minimum age for joining these sites is 13+. Fortunately there are some ‘almost’ social media activities which can be used for multiple purposes. One of these is ‘Fakebook’ https://www.classtools.net/FAKEBOOK from the Classtools site. This is a great tool, but the ads are quite invasive at times. If you purchase a subscription these are no longer an issue, however, try out the site before doing this.

I have used this particular tool for two purposes. The first was used with a group of Year 5 students, still too young to legally be a member of the real website. I used it as tool to explore online etiquette or ‘netiquette’ as well as cybersafety issues. Students learned how to write positive posts, vet their friend requests and the importance of monitoring the information they chose to share, including turning off the location services when sharing photos or videos. This can be done creatively using alternate identities or as if it were the real thing.

The second use I made of this particular online tool – and the one we had the most fun doing –  was to use ‘Fakebook’ to explore the connections between the characters in narrative or prose pieces. I used ‘Pookie Aleera is Not My Boyfriend’ – a novel written in prose (written by Steven Herrick) – as my focus text (what can I say – I love this book). After having read the complete text with the students, we listed the main characters, identifying any obvious characteristics as we worked toward building character profiles.

Once this was done, students nominated the character they would like to use as their focus, working in small group to create a visual description of the character. They then used a variety of methods to make and present their character. Included were simple hand-drawn pictures, and those made using online drawing tools such as ‘paint’. Once these were completed, the pictures were scanned or saved as a profile picture, for use on the ‘Fakebook’ entry.

We chose the end chapters of ‘Pookie Aleera is Not My Boyfriend’ to use as the basis of our conversation and ongoing character development beyond the scope of the text. This was an obvious choice as so many issues came to a head at the conclusion of the story, with positive outcomes and the real possibilities for extended story-lines based on the personalities of the main characters as identified by students.

fakebook

Each of these groups then created the ‘Fakebook’ page for their characters, using the information from the prose novel and adding what they believed would be suitable details in the areas where specific detail was not available. Groups worked collaboratively to develop conversations based on the situations they were familiar with from their study of the text, and adding additional storylines while staying true to the basic personalities of each character.

One of the groups even went so far is solve the mystery – Who is Pookie Aleera?

Image source:

Image used for ‘Pookie Aleera’

https://pixabay.com/en/daemon-mythical-creatures-zombie-1352334/

Other images used are automatically added to fakebook.

Screenshot of Fakebook example.

Herrick, S. (2012) Pookie Aleera is Not My Boyfriend. Australia: UQP

Poetry – it’s how you use it

Say the word “poetry” to a room filled with hyperactive third-graders and you get one of two reactions. They will either shut down and pretend they don’t understand what you are saying, or catcall and ‘boo’ for the perceived torture which you are about to inflict upon them. I haven’t yet had anyone actually run from the room screaming …

In a recent experiment in that third-grade class, I introduced a text written completely in prose entitled “Pookie Aleera is Not My Boyfriend” written by an Australian author – Steven Herrick.


I told them that I would love to read it to them because it was a great story with lots of funny bits, but they were too young. I explained that this particular text would be better for fifth-graders, so they would have to wait till they were older. As planned, they decided they were old enough to listen to the story – even if it was poetry!

This novel has several characters who are introduced in the first pages; characters that are mostly students in a sixth-grade class living in country Australia. The class was enjoying the simple style of the text, but were getting a little confused about who the characters were as the story jumped from one to the next and back again. This was then the perfect vehicle to drive our work on character development.

The class was divided into groups and each was asked to ‘adopt’ one of the characters from the novel. They were given the text where any descriptions were provided, and had to create an outline of what they thought were the main features of their character. There were, as you can imagine, some rather interesting attempts to bring these new friends to life.

Student engagement was high as each group chose the physical appearance for their character, including clothing and accessories in some cases. Once these characters were created, we started re-reading the text and using these creations to provide a visual element to the words being spoken. This has been the only book we have used this strategy with so far, but next year when I have the same year level again I plan to do it again, but this time to take it further by creating some ‘settings’ from the story in which to locate the characters.

I have noticed an improvement in the ability of my students to create characters in their writing – providing more detailed descriptions … I also found that when these same students go to the school library to borrow, they fight over who gets to take home ‘Pookie Aleera … ‘